Monday, February 29, 2016

LOVE Journal Page

Good morning - Barb here to share a journal page.  As you may know or can tell, I am very new to the world of journaling.  I just pretend it is a big card and sometimes I write on it.  How do you approach your journal pages?


My journal page is starting out with a page in my small journal where I cleaned off my brushes and used up leftover paint.  The colors are – of course – some of my favorite colors.  (I was planning on doing something different today and use blues and greens but when I saw this started page, off we go.)  As you can see this was a clean off page, where I cleaned the paint off of my blending sponges.  This gives such a cool background and you don't waste any of that precious paint.


The monthly challenge is hearts and paper piecing.  This very very old heart stamp I have calls out to be paper pieced.  This paper grouping was sitting on my design table.  The colors coordinated with my page so I stamped the heart on different papers with VersaFine Ink and clear embossed.  I also liked this other stamp because I knew I could cut out the heart squares for my page.  Now to find my small scissors and do some fussy cutting.


The fussy cutting is done.  I now inked a piece of a book page with VersaFine Ink and clear embossed it.  I then used my new Maya Road die and cut the word love and several black hearts.  I also found the definition of love in one of my many dictionaries.  Let’s see where we go now that we have a few things gathered together.


I filled in the white spaces on the page with a blue gelato to give me a full color background.  I took a baby wipe and rubbed the color into the page.


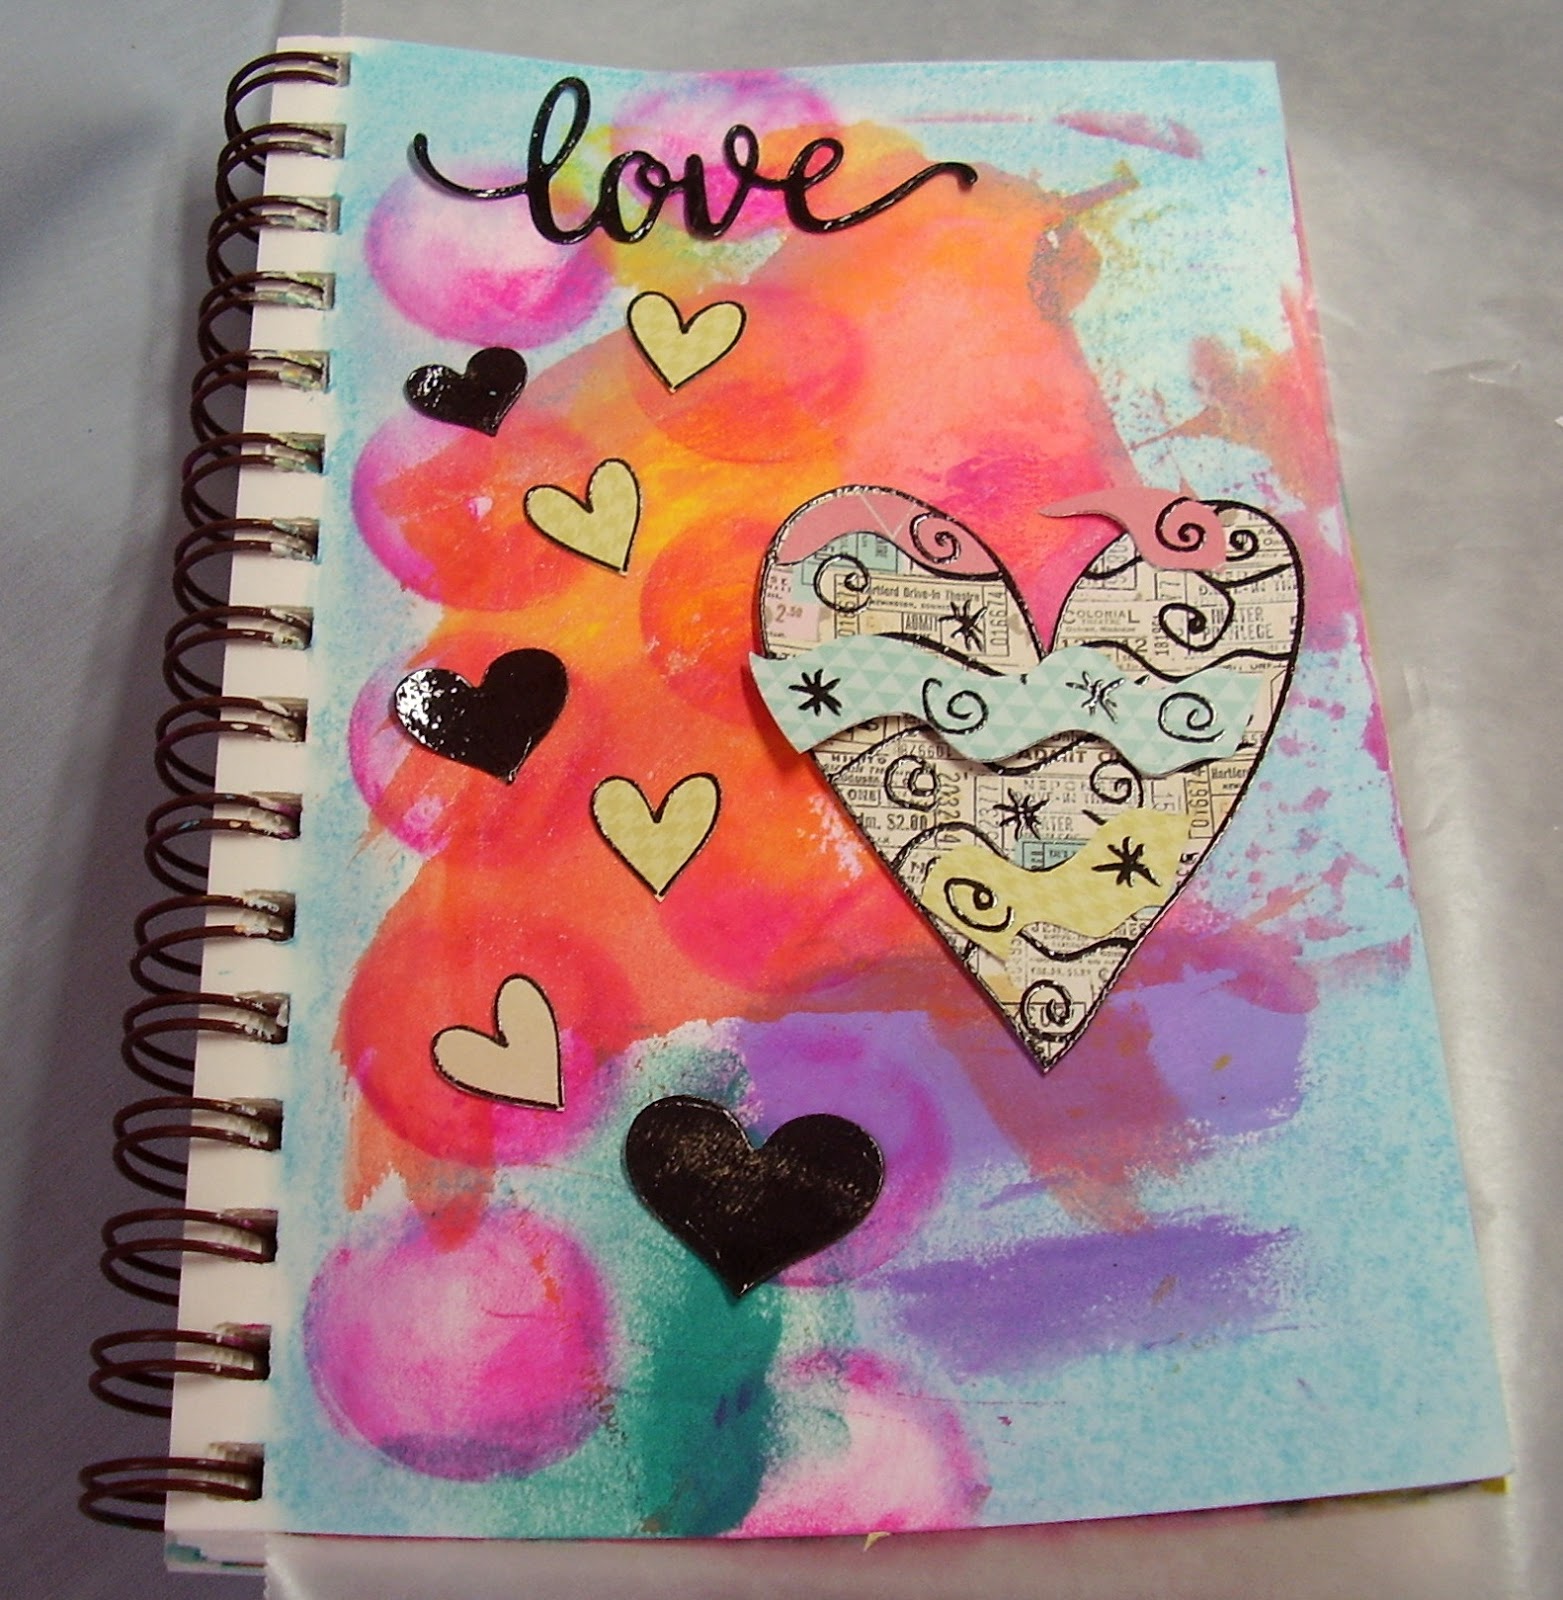
Here is what the background looks like now.  I then randomly placed the die cuts and fussy cut heart and heart pieces upon the page.


Here is the page with everything now adhered with gel medium.  I also used a new stamp I have that was designed by Seth Apter.  I stamped around each circle with it (dah it is a circle stamp so it was an obvious place to do stamping.)


At this point in my creation, I decided I needed to add some more color to my page.  I wanted to bring in a little more of the purple.  After I had done this, I added some more pink and orange in random spots.  I did forget to add teal in another place on the page.  I think It is OK.  Inside of each circle I dabbed with the end of a pen or paint brush some bright pink paint.  Now we sit and wait for the page to dry completely so you can journal.  When I took my classes from Dyan Reavely she said you should let your pages sit for 24 hours before you did any journaling or marking on the page.  This way you did not ruin your pens.

Here is the finished page.  I am very happy with it.  My journaling is very simple.  I could have hidden journaling under the heart if I had wanted to pour out any feelings I had about broken hearts.


Here are some close ups of different parts of the journal page.  You can see how I added a white shadow around the heart with a white chalk pen and then put black dots on top of it.  I also added white circles around the pink dots on the page.


Here is part of my journaling on the page.  It is a very loose script.


I hope you enjoyed my journaling attempt.  I am learning as I go.  For me, journaling is another creative opportunity to use your supplies, make a mess and come out with a piece of creativity that makes you happy.  Go forth, play with your supplies, have fun, enjoy yourself.  

Wednesday, February 24, 2016

Guess who I saw flying over London!


I thought I caught a glimpse of Mary Poppins flying over my rooftop recently, so I made this little picture!

I decided to create the background with bleeding art tissue, but you could easily create it with inks, paints or whichever your favourite medium is.

I wanted Mary to fly over London so I searched on google images for a solid silhouette of London's skyline. When I found just the right one I printed it onto card. Then I took my time to very carefully cut it out to create a stencil. There are many skyline images available of Paris, New York etc, so you can travel the world in your pictures!


I laid the stencil onto the bottom of the card, and used masking tape to hold it in place. I swept black ink into the stencil using a make up sponge. Then I lightly added a calligraphy text stamp to the background.

This background was the result.


The background was quite dark in places, and I wasn't sure if the Mary stamp would show up very well. So I stamped her onto a separate piece of card and then cut her out

I hope you enjoyed this short little tutorial, and may be inspired to create some skyline pictures. I think I will try flying to New York next....

There have been some wonderful entires into this month challenge Hearts with a Twist of Paper Piecing. There is still time to add yours!

Monday, February 22, 2016

Artful Mixed Media tag

Hello my dear crafty friends!
My name is Irit and I am an Israeli designer and the new member of this fantastic challenge blog.
In my real life I am a Dentist, wife of a retired high police officer, Mom of 4 adults and a happy grandma of two adorable  kids. In my spare time (thanks God for the empty nest) I craft and make art and then spend more of my spare time on the folk dancing room floor.
 A few years ago I began my artistic journey with scrapbooking. 5 years later  I am mostly Mixed Media artist and CAS cardmaker. Yes. One side of my soul likes everything messy and colorful. The other one asks for a quite white, with just a bit of stamping, cards. In the middle I still scrap (only when I have perfect studio photos); I work with polymer clay; I am pretty much addicted to resin art too.And I design for a dozen companies too. Middle age can be a blessing!
As I say- my strength is my versatility and it's pretty obvious when to visit my BLOG.
So today I am going to share a small tag tutorial and I think those technique can be used on cards, layouts, canvases and whatever.


I made this simple- not so - tag with paints, stencils, mediums and some letter stickers and it's all about counting your own blessings.The whole concept was made because of the number stamps. First I decided to use them. Then I picked the saying. Then everything else was done around those two.
So the new Pick a number stamp set from Rubber Dance Art Stamps is a star of this tag as you can see.
So let's see how to make this tag!
1. Make a hand mad tag (or use the real one if you have it) and cover it with 3 colors of fluid acrylics.


2. Use stencil  (ARTplorations) to add the long arrow over the tag using modeling paste or any other texture paste and heat dry the paste to make some fun bubbles over the dry paste.


3.Use another stencil and add some wording with white acrylic paint. Let the paint dry before the next step.


4.Stamp the numbers randomly over the painted tag using permanent black ink. I also added some more numbers later and this is not shown on this photo, but on the final tag only.


5.Add some more golden paint over the white words and the arrow and paint the edges with the darker red paint to make the frame of your tag. Make a hole to add the ribbons on the top of the tag.


6.Add a few final touches to your finished tag. First I added the letter stickers  to make my title. Then I outlined the white words with black fine markers. I also added some white doodling over the edges with white pen. Tie the ribbons and your art tag is done.


You still have time to enter our February challenge!


Wednesday, February 17, 2016

Sew Special Tag Accordion Book

Hello, Deb Riddell here today with my first post as a member of the Mixed Media Mojo design team!
I live in British Columbia, Canada on a small acreage with my hubbie and our rescue dogs who are much better known as our kids.  I started on my creative journey as a decorative and water colour painter and then branched out into creating home decor and decorative items after discovering the world of folk and primitive art.  From there it was a short hop to mixed media which is my current passion (and dare I say obsession!) and I am so happy to be able to share some of my work with you here at Mixed Media Mojo.

I recently made a little tag accordion book from hang tags and thought I'd share a tutorial with you today.  The tag book was made for a sweet blogging friend who very generously gifted me with a whole bunch of mixed media supplies she was destashing.  I made the accordion book using some of the supplies that she gave me and since she is a wonderful seamstress, I made it with somewhat of a sewing theme.
I made my book from five #8 hang tags, but you could use as many tags as you wanted or any size of tag that you have handy.
I then chose five scrapbook papers from the assortment my friend had given me to cover the tags front and back.
There are papers from Graphic45, BoBunny and 7 Gypsies here, some of the others weren't marked though so not sure what designers they are from.

I cut the scrapbook paper so that I had about an 1/8" reveal on all sides of the tag and aged the hang tags and edges of the paper with some Vintage Photo Distress ink before adhering the scrapbook papers to the front and back of the tags.
I then took some Tim Holtz Tissue Tape (Symphony) and attached the tags together edge to edge.
You could also use washi tape to attach the tags or make a hinge out of some scrap cardstock.  I like the look of the tissue tape over top of the scrapbook papers but if you didn't want to see it, you could attach your tags to each with the tape BEFORE applying the decorative papers.  I also punched the hole in the top of my tags so I could add some yarn but you can leave the holes covered if you didn't want to add the yarn embellishment.

And then it's time to embellish each page.  I made sure to alternate any dimensional embellishments so that the book would close easier.
To close the book, I punched a hole through the end tag and used a length of the yarn to tie it closed.  In making this book I used a combination of sewing themed stamps and die cuts and an assortment of embellishments and stamps that my friend had sent me.
Hope you've enjoyed the tutorial, the tag accordion books make up quickly and are a lot of fun.  It would be a great way to display a tag series or a group of tags made to celebrate a season or holiday.

Thanks for stopping by today and hope that you will check out our February challenge:
and come join in the fun!  Happy creating,

Deb xo

Monday, February 15, 2016

Let's Soar

Hey there!  Maria here today with a Art journal layout:

This is my 2 page layout done in the 8x8 Dylusions art journal.  I took a few pics of the products and process but not every step.

I first started with Dylusions Paints in the background "scrapped" on with a credit card.  Black circles were added using Black Dylusions Paint and a stencil. 

I love these pineapples by Avery Elle.  I stamped a bunch and colored them with watercolors.  The cocktail glasses were cut from an image I found online.  I tried to free hand the shape but mine kept coming out wonky.  The Andy Skinner stencil you see in this picture is the one I used to add the words on my pages.


I used a basic glue stick to glue down the pieces. 


I love sparkle so I added Star Dust Stickles to the leaves of the pineapples and the top of the yummy looking cocktail.


I used black Dylusions paint and the Andy Skinner stencil to create the 2 words.  Then I used a Signo White pen to outline them.  I used a black and white Signo gel pen around the entire layout.


Thanks so much for stopping by today! I hope you like my Let's Soar layout!

Maria

Wednesday, February 10, 2016

I am nuts about you-- mixed media card

Hi All
Mayoori  sharing a mixed media card , that I made for my hubby.


Process

  1. Started with a coat of gesso on a piece of recycled cardboard .
  2. then stencilled it with Decoart gear stencil. 
  3. dried it with heating tool , so as to get more grungy texture.
  4. applied gesso on the gears and nuts and kept them aside for drying.
  5. In the mean time , applied Deco art carbon black mist, red oxide cream, tuquoise shimmer mist,thinning and spreading them with water spray.
  6. Once dried , hot glued the gears and nuts on the cardboard and then painted them with decoart metallic copper and metallic blue.
  7. sprinkled some heat embossing powder on he nuts and gears and heat embossed them for rusted texture. 
  8. Finally gave a thick coat of varnish for some shine and protection..
Hope you will like it. Thanks for visiting . Dont foget to play with our monthly challenge

Monday, February 8, 2016

Hearts Journal Page

Hi everybody, Hazel here and today I'm sharing a journal page with you.


The pages in the journal that I've used are very thin so I gave the page two coats of gesso, when this was dry I coloured the page with Gelatos, spreading them with my fingers.


I used a heart stencil and a baby wipe to remove some of the colour, the word love is also a stencil.


I stamped some script on the page and stamped round the edges with a Dina Wakley heart stamp.


I splattered the page with white paint and used a white pen to put some dots round the black hearts. I stamped the two main hearts onto a book page and cut them out. The stamps I used are Elusive Images[Chocolate Baroque]. I glued the hearts to the page and added a couple of red gems.


Thank you for looking.
xxx Hazel.

Wednesday, February 3, 2016

Frame

Hello! It's Lucyna here.
Today I would like to inspire you with an altered frame.


I used an old one, applied a coat of gesso and used an ordinary comb to deepen the grooves.
I glued two chipboard flourishes up and down the frame and gessoed them too.
The frame was coloured with gelatos and dylusions ink spray. 


The frame is meant for a man so the ornaments are reduced to paper pieces, metal and resin parts and my fav vintage trinket from Prima, which reflect his hobbies.


Hope you like it!